Showing posts with label Organize. Show all posts

Monday, September 14, 2015

Essential car care caddy

Essential car care caddy


Since we love our beautiful - small family size - car , we like always to take care of it whenever we have time for that. We used to take it to the car wash stations whenever we feel it a little dusty or needs to be cleaned and washed. Buutttttt after having a little funny toddler setting in the car with all of these snacks and crackers we had to care about it a little bit more than before.

We like to wipe the dashboard , vacuum the floor and clean some stains on the seats from a time to time. And because my husband does a lot of driving in the morning and in the evening everyday, and because we go out sometimes in the holidays , a car care products and essentials caddy became a must.

Tuesday, July 28, 2015

An organized craft supplies area

Our craft section in the office room was occupying an Ikea BILLY bookcase in our office room. Last year I wasn't so excellent enough in taking photos and the DIYs were not so perfect from my point of view and now the craft area is a little empty and it has been put in hold for a while as we have a nice toddler running around and when it comes to a jewellery maker craft storage ... This is absolutely dangerous for my toddler.

 But I still like to show you the photos of how craft area was last year because I still remember how  it was so fun to organize such area. I am so into organizing craft supplies. I love the challenge organizing small things especially when they are so small, so pretty and so colourful. So let's take a look

An organized craft area

Saturday, June 6, 2015

DIY diaper changing organizer

One of my favourite projects that really work for years now is my toddler DIY changing diaper organizer. I know I have shared it before but I thought also of making an update as some changes occurred. My toddler grew up a little and he no longer sticks in a place so some habits and activities changed. Another reason is because I didn't share an exact tutorial of how to make it. So here we are.

DIY diaper changing organizer

Thursday, May 28, 2015

Organizing shoes

In our entryway we have an Ikea BISSA shoes organizer. As a reason we used to have an empty entryway for a couple of years, we decided to buy some pieces of furniture to be pretty and also functional in the entryway, so we decided to buy this pretty shoes organizer as one of those pieces to store our daily worn shoes.

Organizing shoes

It was kind of organized at the beginning but a while later it started to become messy and jam-packed with flip-flops and shoes. It is a little bit of a shame to show you how it looked before.

Thursday, May 14, 2015

A simple mail center

The simplicity of a project is very important to keep it usable and functional. In our house entryway, we have a very simple mail system. Beside the shoes storage we added two simple magazines' racks. I decided to specify them to manage and organize all papers that come in and out our home in the mean time before they get filed.

Organizing mail center

We have a black shoes storage. I found these magazines' rack in an office supplies shop. Each one costs 100 EGP which are 13$. I wish I had them in black but I couldn't find them in colours. I solved the problem by purchasing some black files and put them inside the clear organizers. They look now more fantastic than I thought. Each one of these two racks is divided into two pockets. I aimed to keep the mail center as simple as possible to be easy for all family members to use. So four sections for the whole system are more than enough for me to sort papers.


Organizing mail center


The first two pockets are holding all papers that come in and out of the home. Inbox for incoming mail and Outbox for outgoing one. Paying bills as soon as possible and checking the mail daily are excellent tips for keeping your papers organized. So these two categories are so helpful when I feel lazy to sort the mail in more details or when I am in a hurry. When I get the mail, the whole papers are kept in the inbox section till the time they get sorted. The Outbox section holds the papers that need to go somewhere out of the house.

Organizing mail center


The other two pockets are used when I have some time to sort the mail. "To File" is the pocket where I put any papers that need to be filed in the office room or in my receipts file. Any papers I want to keep like paid bills or bank statements are kept in there.


Organizing mail center


Any bills need to be paid, paper that needs an action to call, to reserve or to ask for more details are all kept in the "To Process" pocket. It also holds any papers I want to take look at like catalogues or invitations. Any other unneeded papers are thrown away in the trash can after blacking out some sensitive information.

Organizing mail centre center

How to you sort your mail? What are the categories you specify for it? I am waiting for you to share your organizing projects to inspire me. See you in the up-coming post.

Monday, May 11, 2015

Organized receipts and home papers

One of my favourite small,quick and easy organizing projects I have done through the latest months, is organizing receipts and home papers. We used to keep all long term receipts in addition to some helpful information papers like flyers and menus to be available when we need them.

Organized receipts and home papers

Friday, May 1, 2015

A handy kitchen cart


Choosing to have a handy cart was one of  good solutions to maximize space in our little small kitchen. I believe that the kitchen cart  must be functional enough to help you when you are cooking a tasty dinner.

In the past my kitchen cart was full of grocery plastic bags and some clutters. It was a shame to have pictures that time. In fact, I wasn't expecting it to turned out beautifully like that .

So, I am so excited to share my kitchen cart I tackled a few weeks ago. I aimed to make it handy for me while cooking, and because I am dying for more little work space in the kitchen, the cart is sooo thankful to hold my cooking tools I use everyday rather than having them on my counter top.  

Organize kitchen cart


In addition to put my cooking tools I use on a daily basis, I loved to make it decorative and have a little of my touch. You may noticed I attached a tray to act as a shelf there and it so shiny and looks fabulous.


Organize kitchen cart


The cart is taking a place beside my kitchen lower cabinets and it is exactly facing the stove. So I decided to put my cute utensils' jars I shared last week on top. They help me to get things done as quickly as possible.

Organize kitchen cart

I am dividing  my utensils into three categories (prepare, cook and serve). Each jar is specified to category. I also added my kitchen towels that I use in holding hot pots and trays or to dry some dishes.

Organize kitchen cart


I love to keep my kitchen hand towels in reach. So for me, this is the best place to keep them on hand. I  used a small tray holding them. I also have our tangy juice and a beautiful flower wooden jar to add a decoration to my kitchen cart.

Last but not least. I added extra kitchen towels In the bottom in case I am running out of the towels on the roll above.

What do you have in your kitchen cart? Do you have your daily pots and pans, mugs and bawls? I like to hear from you so please leave a comment below. See you in the up-coming posts.

Friday, April 24, 2015

Organizing medicine


Our beautiful bathroom has a very small medicine cabinet, so I keep all our medicines and vitamins in a home care area we established couple of months ago. It is really a fantastic feel having all medication in one place. Easy find, easy grab and easy put away.

In addition to my toddler medication, we keep our vitamins, first aid, medicines and some medical tools. I decided to keep our toddler medication in his closet as a trick to avoid jam-packed stuff in one area.

In order to organize our medicines, the first step should be purging all expired stuff or medicines that will not be used again like surgery or pregnancy medications. Then I started to categorize them according to the reasons. When I have a pain in muscles I am not sure if I have a bill, spray or gel as a pain killer for it. So categorizing medicines according to type is not working for me.


How to organize medicine


For this easy cute medication system, I chose easy system for less used stuff, easier one for more used stuff and the easiest for the most used. I purchased these boxes in an inexpensive price. I put the digestive and flu medicines on top because we use them more. Other medicines and extra vitamins in the bottom.


How to organize medicine


I love drawers for easier access, so they are convenient for more used medicines. Pain killer and first aid need to have easy home and because we use the muscles and bones medicines the most, I chose to put them in drawer as well.


How to organize medicine


Everyday vitamins and medicines are kept on the very top section in the drawer box for the easiest reach. Courses medicines - like antibiotic in case of flu-  are kept there in order not to miss them.


How to organize medicine


Tools that we use during medication are also kept in one of the drawers. Syringes,  fever patches and thermometers are all in there.


I am looking forward your projects to inspire me. Tell me how do you keep and store your medicines. How does it impact to your daily routine. Comment and subscribe in order not to miss any post. See in the next post.
                                                            

Saturday, April 18, 2015

Organizing kitchen utensils

Although I do not have that much of kitchen utensils, they were jam packed inside the kitchen drawer. It was hard to find one of them in there without getting a little hurt because of a gadget somewhere in the drawer.

They had unknown place with the other kitchen tools in the drawer until I found those cute holders for kitchen utensils in "Carrefour". They were pretty cheap and really useful for my everyday use utensils.

Organizing kitchen utensils

They act as a very convenient home for the kitchen utensils that I use everyday. What is also nice about these holders that they can be hanged next to the stove or working table.

First of all purging is a must for utensils specially when they are duplicated or some of them are out of use for a long time.

Organizing kitchen utensils


Categorizing them was the next step, I was thinking about ( bake , cook , serve ) way to organize my utensils. But since I am not baking too much and I use only one whisk for only cooking sauces, I was thinking about preparing, cooking and serving food as categories. So I got my label papers and printed out some elegant labels to decorate the cups and add more functionality to them. 


The prepare cup holds all the utensils I use in preparing food. Silicon brush , spatulas, strainer, vegetable peeler , lemon squeezer, meat cutting knife and also kitchen scissors. I suggest also any utensils used in preparing, cutting and cleaning food such as fish peeler or potato masher.  In cook cup there are whisks, draining spoon and tongs. Last but not least in serve cup there are cake and pizza serving spoons and ladles. I also have a place there for spaghetti serving spoon and ice cream spoon .


Organizing kitchen utensils

I chose my kitchen cart as a home for these cute holders and they are so handy there. They really took few minutes to finish.  Do you have any other solutions for your everyday use utensils ? Looking to see you in the up-coming posts and looking more for your organizing projects to share.

Monday, September 15, 2014

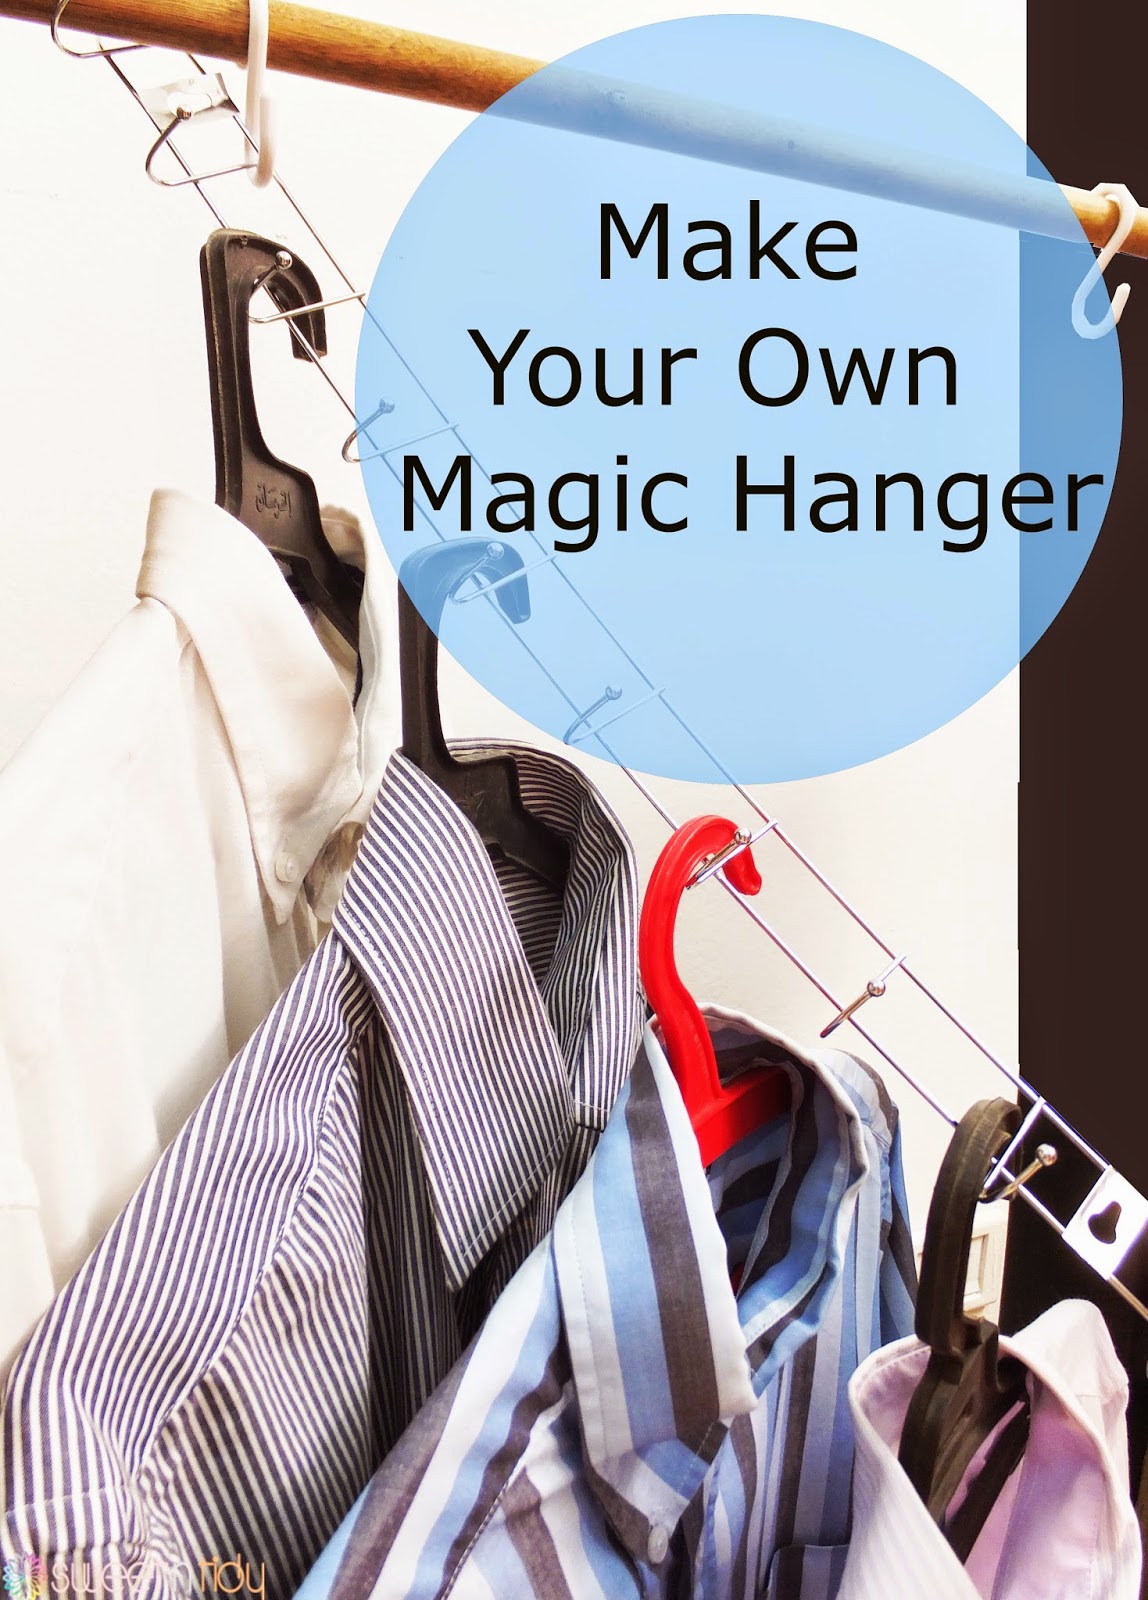
Make your own Magic hanger


Make your own Magic hanger


Remember those magic hangers we see on TV and here and there over the internet ?


You know how much this saves space, right?. It is useful for small closets and limited spaces. I wish I could buy too many, but why I have to buy when I already have a free one in my home? I just inspired the idea and it's all  done. I couldn't believe I have it. 


Anyone can do it with no time . It's super easy and inexpensive. Do you you know the hangers we used to  hang behind doors? those which you find everywhere in dollar store ? Just check this out.


Make your own Magic hanger

This is the normal hanger. With S-shape hooks I hang it to the closet stick.


 The hanger already is divided like a chain.I hanged a cloth hanger in each section.


So this is the normal state for the magic hanger. To maximize the space . Just remove one S-shape hook and you are done. Are you ready?

Make your own Magic hanger

Tadaaaaaaaaaaaaaaa .


All the shirts now are hanging vertically . I love the way it turns. 


Make your own Magic hanger


You can see now. The shirts take no much space . No screws . No drill . No even glue and DIY complicated steps. Just S- shape hook and regular door hanger. you are done. Congratulation for the new magic hanger you freely have.


I hope you liked this post. Please leave a comment below if you liked this. Make my day and subscribe to not miss any up-coming posts. See you.

Wednesday, July 30, 2014

How to organize origami papers

As I said before I am so crafty person . I like crafts so much . I have  too many origami papers which I use to make very beautiful origami shapes. All what I did to organize them is to get a shoe cardboard box and covered it with contact papers and made cardboard dividers for it.

How to organize origami papers


Here is how to do it

How to organize origami papers


I cut 3 pieces of cardboard  W x H and two pieces D x H. In equal spaces I cut  H/2 stripes inside the cardboard pieces to make room for the mutual cardboard pieces to in like a mesh. It now fits all my origami papers . Also my folded origami pieces .

How to organize origami papers

A quick tip . If you have small pieces of origami papers remained from your projects just group them with elastics  or rubber bands. 

How to organize origami papers

And this is how I organize my origami papers. I also grouped them by colors to make it easier to use.

How to organize origami papers


I hope this post was helpful . I like to see your comments and send me your pictures about any craft organizing you made. Thank you for reading . See you next post

Monday, July 28, 2014

What makes you hate laundry


Laundry means a pile for everybody. I have to say the truth. Like most of us, I hate laundry. I used to have a pile of laundry all the time. I always have the same problem with my baby that he has  nothing to wear after all his clothes dropped  in laundry basket screaming for wash. I have to spend two or three days getting rid of laundry pile every week with hard working washing  machine and no extra space to hang out the wet clothes.

I live in a good weather environment. Dryer for us is an accessory that we will never think of when we buy home machines because we already have a good, hot and shiny weather to dry clothes . The washing machine already rinse the clothes up to 70% dryness or more. We hang the 70% wet clothes in balcony for fresh air and  shiny sunlight killing germs. Sounds good, but I still hated the laundry. Before I go to my problem let me think about what makes most of women hate laundry and have pile of it.

Bad weather


If you have a bad weather in your environment, it means that you will not make your laundry for today. This is an easy solved problem by finding a room in your home that has a good amount of natural light and with internal rack you are done.

Too lazy


I have to stop here to think about the reasons make you feel lazy about the laundry like :

Long process


We all think that laundry takes forever to be done. Very long process to be run. drop clothes in laundry basket, divide them, check pockets, wash them, dry them if you have dryer, hang them, collect them, fold them, iron them and put them in closet, them, them them ... lol . Sounds too many steps with them. This frustrates you as any long process to do in home.

Heavy washing basket.


If you have a pile of laundry which looks like weights in your hands, you will be the most frustrated wife in the world. You will spend the whole day washing clothes with long programs in your washing machine. They are too many and you are too busy.

uncleaned balcony or laundry room.

If you have balcony  that's full of dust or a messy laundry room, this will be a main reason to make you hate laundry. It is just because sometimes we ignore the balcony as if it is not a part of the home. Like it is outside and always full of dust and it takes a long process to clean.

So how to make it easier and overcome these problems? here you are some tips

Overcome bad weather


As I said if you have a bad weather like one or couple of days, dry your clothes over an internal rack. If you have bad weather most of the time, dryer must be added to your laundry room if you don't already have one.

Overcome the heavy baskets


Sometimes you are in a hurry and bring some clothes to wear from the closet, wear them and you change your mind or you will not wear them for any reason. After a while when you organize,  you will not be sure is this is uncleaned or what and it ends up to be in the laundry basket. Have a moment to drop them in a place you know, instead of throwing them in the ground. Same goes for work clothes you wear for one day. Just hang them into fresh area and they will return like new. Don't think it is easy to put all clothes around you in
the laundry basket. Plus I will share with you my routine that overcame all of problems we mentioned above in the next posts.

Overcome uncleaned laundry room

Don't  ignore your balcony. Treat  it as a part of your living room. Clean it whenever you clean your home. Also make your laundry room a beautiful place for you like adding some frames, plants or table with a flower vase. this will motivate you for going to balcony or laundry room too many times.You are done.


I like to hear from you . what makes you hate the laundry. On the other hand if you don't hate laundry tell me why do you like it. What makes you like it. I am waiting for your feedback and comments. See you next post

Saturday, July 26, 2014

Free baby dresser labels

I shared my baby dresser while ago and  I would like to share also the cute labels I made for this adorable dresser

Free baby dresser labels

Feel free to download it from here. I hope you liked them . I think they are so cute aren't they ? I am waiting for your comments and feedback. See you next post.

Monday, July 14, 2014

How to organize manuals


How to organize manuals

I took a long time enhancing this project. I have inspired the idea from Alejandra Costello. She has already poly envelopes made already for binders and each holds up to 200 papers. She also got little cute tabs to label her manuals. She has two manual binders, one for things that she will leave when leaving the house and other for expensive things she buys.

Unfortunately I have totally different circumstances. that's why it took me some times to think and apply.We don't have same products in my country. I was looking for poly envelopes for binders and I didn't find any. I also couldn't find A4 poly envelopes also I didn't find A4 binders. We take everything when we leave houses. We don't leave anything when we leave so I have to have only one thick binder to store all manuals. How did I come over all of these problems? Check this out.

How to organize manuals

How to organize manuals

I got normal clear A3 poly envelopes and one think binder. I have punched the poly envelopes myself with the puncher. It was hard to punch them all at the same position point but I figured this out finally. I marked the points and I removed the lower part of the puncher - that holds the circles come from punching- so that I can see the marks I did from the back of the puncher. This way I punched all the poly envelopes in the same exact position and they are now ready to go inside my binder rings.

How to organize manuals


 Unfortunately this poly envelopes were a little taller than the binder, so I couldn't add any extra tabs over. This would be very high and would not look pretty. And this what I did


How to organize manuals

I just labeled the top of each poly envelope without any tabs. That way I can see what the categories are. 

How to organize manuals


If I put all the same category manuals in the poly envelope they will all fall in the bottom of the envelope and I will end up with very think binder. You may noticed that I don't have a very thick manual binder. This because I came up with this beautiful solution.

How to organize manuals

How to organize manuals

 I sewed the center of the poly envelope with the sewing machine. Now I have two pockets in each envelope for the same category and the manuals will spread over the envelope and not falling to the bottom of it creating a thick envelope at the end. That's because I noticed that most of the manuals come with half A3 size.

How to organize manuals


 I sub-categorized the categories. For examples I have all my temperature machines manuals in the same category. I just sub-categorized them into two sub categories, the machines that make high temperature like heaters and warmers and the machines that make low temperature like air conditioners and fans. 

How to organize manuals


Same goes for electronic devices I sub-categorized them into devices that we use inside house like land line telephone and devices we use in outdoors like cell-phones and cameras. 

How to organize manuals

Of-course computers&networks will be divided into computers and networks sub-categories.

How to organize manuals

Kitchen is divided into small  machines like boilers or coffee machines , and the big machines like oven and fridge.

How to organize manuals

For entertainment category, ummm ... I didn't find a good sub-categories. They all are around the TV. The receiver , xbox and DVD player. Maybe if I have a piano I will find something.

How to organize manuals

A good tip I want to share here is that I group the warranties and the receipts for each device together with a  paper pin . For example the xbox came with too many small different languages manuals. I grouped each three of them with a rubber band and inserted them sequentially.

May categories are 

Electronic devices  (In home -  telephones, irons ...etc / Outdoors - camera, cell-phones ... etc  )
Computers & NW (Computers  - USBs, DVD reader ... etc / NWs - routers , access points .. etc)
Beauty (Hair - blow dryers, flat iron ... etc / Others - sunglasses warranties, lash curler .. etc)
Baby stuff (Furniture - baby bouncer, baby walker ..etc/ Food tools -  milk bottles , spoons .. etc)
Temperature (High - heaters, warmers .. etc/ Low - air conditioners, fans .. etc)
Kitchen ( Big machines - fridge, deep freezer ... etc - Small machines - coffee maker, boiler... etc)
Furniture (Wooden - library, chair ..etc - Accessories - expensive vases , chandeliers .. etc)
Entertainment

You can add or adjust as you want. This is your categories and you are free to do what you feel and like.

How to organize manuals

I put the label on the binder.

How to organize manuals

and I put it in my office.

So that was how I organized all my manuals. I hope you liked the post and found it helpful. Have a food time and comments please if you liked the post. See you.


This post has been featured/shared in 


Wednesday, July 2, 2014

How to organize ribbons

This is a lovely project I made few months ago. I organized my old and new ribbons in this small box and I spent ZERO BUDGET as usual.


This was a shoe box that I covered with contact papers and I organized all kinds of ribbons, threads and strings there. I also have my shiny tapes and wire rings.


How to organize ribbons


I know this doesn't look fancy but it still looks pretty, organized, Sweet N Tidy. These are all my ribbons. New ribbons, old ribbons and even the remains. I will show you exactly what I have done here.

First of all I used to have big wide spools with small amount of threads or ribbons, so I turned  all similarities into one spool to have several empty spools so that I can use them for other ribbons which don't have spools. I started to turn the ribbons over the spool, and because the spool was so wide and the ribbons were thin the spool was happy to take several ribbons close to each other. I secured their ends with a hot glue drop for each. I made this for only ribbons that have the same size and colors because I am sure I will use only one of them - it doesn't make sense to open one secured ribbon while I already have an opened one that has the same color and shape - so I am sure now that I will use the ribbon freely with no effect to the other ribbons in the same spool because they are secured.


Some of the ribbons weren't have any spools. I made a DIY spool for them using plastic bags cardboard roll and two pieces of cardboard that I cut into circles, You can see them in the purple and the green ribbons.


How to organize ribbons


I got grilling sticks and setup them into the box and have organized my ribbon spools inside them. To get the sticks more space to dig into, I added some pieces of thick tape.


How to organize ribbons

For short ribbons, I cut these pieces of cardboard and covered them with duct tape then I turned around the ribbons over them securing the ends with pins or like the upcoming photo shows.

How to organize ribbons

I secured the ribbons at the ends like that.

How to organize ribbons

Sometimes I use those remaining pieces of ribbons to make a ribbon colorful balls so I secured them with rubber bands .

How to organize ribbons

I used this small box to store them.

How to organize ribbons

I had some shiny tapes that I grouped them all with some broken sticks.

How to organize ribbons


So here we are. the final look

How to organize ribbons

How to organize ribbons


If you liked the post please comment. I am waiting for your comments and feedback. See you next post and thank you for reading.

This post has been featured/shared in