Monday, September 21, 2015

Cleaning Mold from Bathroom Ceiling

Keeping mold out of your bathroom is a tricky task. It's hard to prevent mold in places that experience plenty of moisture and humidity on the daily. Still it is essential to remove mold as soon as you spot it. There are many reasons you want spores out of your bathroom. Not only does mold smell and look bad, it is a health hazard and it can damage your home. So, how do you keep it at bay? There are many store-bought cleaning products touted as mold removers but most of them are just as toxic as mold itself and you want them out of your way. The best way to go is to use your own ingredients (we use a little bit of bleach to do the trick though). At least you'll know what to protect yourself from. Here is how to clean mold from your bathroom ceiling.

Cleaning Mold from Bathroom Ceiling
source
Examine your ceiling

If you have spotted mold on your bathroom ceiling, it's a good thing to examine it before you start cleaning. Take a good look at the ceiling. If there is mold, there should be black or green spots of different sizes all over the surface or in one area of your ceiling. 

Prepare a solution 

The next thing you want to do is prepare a cleaning solution that will get rid of mold. It's best to put on a cotton face mask, gloves and goggles for protection. Also, make sure to open a window and close all vents off to keep mold spores from spreading. Mix 1/3 cup of laundry detergent, ½ cup of bleach and one gallon of hot water into a bucket. Stir well. Be careful. You don't want the solution to spatter outside the container.

Clean

The next step is to start cleaning. You may want to use a ladder to reach the ceiling. Be careful not to fall during cleaning. Take a clean sponge and soak it into the solution you just made. Scrub the affected area. Start at one corner until you work your way to the final spot.

When you are done cleaning, take another clean sponge and soak it into plain water. Rinse the ceiling. Turn on the fan and let it work for about half an hour. If necessary, repeat the procedure again. Even though the ceiling may seem clean, there still may be mold spores. What you need to do is apply a solution of borax and water onto the ceiling. Don't rinse. This step provided by Domestic Cleaners in Greenwich aims at killing all remaining spores and preventing mold growth in the future.

Additional tips

The fact that you cleaned all the mold in your bathroom doesn't mean that no mold will form in the future. Since your bathroom is constantly exposed to moisture, it is likely that spores reappear every now and then. Hence, you need to reduce moisture in the room. The first thing to do is to increase ventilation, whether you open windows or run the exhaust fan. The next step is to fix any water leaks that may be causing more moisture problems. And finally, be sure to clean your bathroom occasionally to prevent mold and mildew formation.

Additionally, if you regularly spray your bathroom ceiling with undiluted vinegar, you will prevent mold formation in the first place. Vinegar is very harsh on mold. While it may not be as effective in removing mold as other products, it still works wonders on keeping spores at bay. Prevention is the best cure.  

Hopefully, these tips will help you to keep mold out of your bathroom.  


"Anna is a young entrepreneur, living in London. She is experienced in the field of organizing, home improvement and home design. Feel free to get in touch with her via G+  because she loves to hear from her readers."


Monday, September 14, 2015

Essential car care caddy

Essential car care caddy


Since we love our beautiful - small family size - car , we like always to take care of it whenever we have time for that. We used to take it to the car wash stations whenever we feel it a little dusty or needs to be cleaned and washed. Buutttttt after having a little funny toddler setting in the car with all of these snacks and crackers we had to care about it a little bit more than before.

We like to wipe the dashboard , vacuum the floor and clean some stains on the seats from a time to time. And because my husband does a lot of driving in the morning and in the evening everyday, and because we go out sometimes in the holidays , a car care products and essentials caddy became a must.

Tuesday, August 18, 2015

Cleaning mop and broom

When it comes to mop and broom I have to say that I don't feel my home clean enough if I still have unclean mop or broom. It makes sense to say that we want to clean our floor with a "clean" cleaning tools. cleaning tools are so thankful for cleaning our houses' floors, so they deserve a good cleaning routine after each use.

Mops are absorbing all the dirts and stains off the floor. This makes a good excuse for it to hold bacteria, dirts and germs that we don't want to keep it so far in our houses. On the other hand reusing the mops in this case will put the germs, bacteria and of-course the dirts back on the floors.

Sometimes an unclean mops creates a bad and mildew smell when using it which is absolutely against the feeling of a clean area. So to clean my mop I just start by soaking it into warm water with some detergent and start the process. This is my mop before cleaning.

Cleaning mop and broom


Tuesday, July 28, 2015

An organized craft supplies area

Our craft section in the office room was occupying an Ikea BILLY bookcase in our office room. Last year I wasn't so excellent enough in taking photos and the DIYs were not so perfect from my point of view and now the craft area is a little empty and it has been put in hold for a while as we have a nice toddler running around and when it comes to a jewellery maker craft storage ... This is absolutely dangerous for my toddler.

 But I still like to show you the photos of how craft area was last year because I still remember how  it was so fun to organize such area. I am so into organizing craft supplies. I love the challenge organizing small things especially when they are so small, so pretty and so colourful. So let's take a look

An organized craft area

Monday, July 20, 2015

20 minutes decluttering challenge + New contributor to Sweet N Tidy

Today I would like to introduce a lovely new contributor to Sweet N Tidy. Anna Aamone,


"Anna is a young entrepreneur, living in London. She is experienced in the field of organizing, home improvement and home design. Feel free to get in touch with her via G+  because she loves to hear from her readers."


Anna talks today about a routine she suggests to help in clutter free. It is based on 20 min everyday concentrating on only one room pr area in house. I like these smart routines that takes a little time with a big results. So leave you with her.

20 minutes decluttering challenge

"Cleaning and organising the home always seems like a big challenge. Time is certainly one of the biggest problems, mainly because it is never enough. When you have million things to do, you have to plan every free minute you have, in order to finish with all tasks for the day. The cleanness of the home is certainly important, so you can't afford to neglect your responsibilities for too long. One way you can cope with the situation is to make a list with all of your cleaning tasks and combine them in a way, which will allow you to complete them all. Since it will be probably impossible to clean your entire house all by yourself for one day, you can plan a 20 minute decluttering challenge.

Saturday, June 6, 2015

DIY diaper changing organizer

One of my favourite projects that really work for years now is my toddler DIY changing diaper organizer. I know I have shared it before but I thought also of making an update as some changes occurred. My toddler grew up a little and he no longer sticks in a place so some habits and activities changed. Another reason is because I didn't share an exact tutorial of how to make it. So here we are.

DIY diaper changing organizer

Thursday, May 28, 2015

Organizing shoes

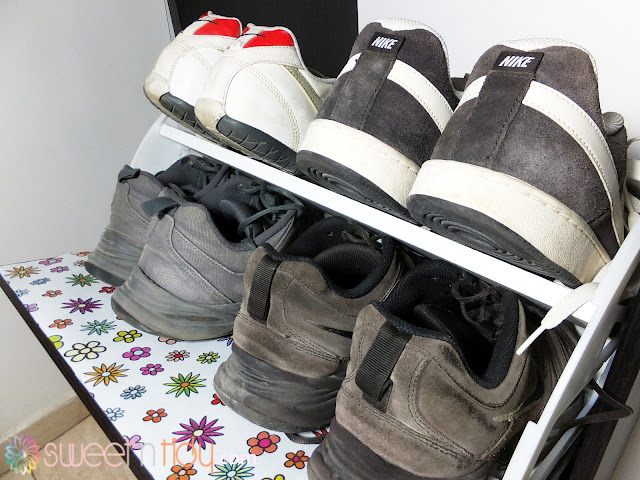
In our entryway we have an Ikea BISSA shoes organizer. As a reason we used to have an empty entryway for a couple of years, we decided to buy some pieces of furniture to be pretty and also functional in the entryway, so we decided to buy this pretty shoes organizer as one of those pieces to store our daily worn shoes.

Organizing shoes

It was kind of organized at the beginning but a while later it started to become messy and jam-packed with flip-flops and shoes. It is a little bit of a shame to show you how it looked before.

Wednesday, May 20, 2015

6 Easy Tips to avoid getting mad in the kitchen

One of problems that I used to face when I was cooking or washing dishes was getting mad because of small annoying things, Dirty floor, hands full of dough while something needs me outside, can't find something I am looking for..  etc.


I was wondering and taking closer mind shot for why was that happening. I figured out that these annoying things can be solved easily with some small solutions.

1.Wear kitchen slipper.


6 Easy kitchen Tips while cooking


Thursday, May 14, 2015

A simple mail center

The simplicity of a project is very important to keep it usable and functional. In our house entryway, we have a very simple mail system. Beside the shoes storage we added two simple magazines' racks. I decided to specify them to manage and organize all papers that come in and out our home in the mean time before they get filed.

Organizing mail center

We have a black shoes storage. I found these magazines' rack in an office supplies shop. Each one costs 100 EGP which are 13$. I wish I had them in black but I couldn't find them in colours. I solved the problem by purchasing some black files and put them inside the clear organizers. They look now more fantastic than I thought. Each one of these two racks is divided into two pockets. I aimed to keep the mail center as simple as possible to be easy for all family members to use. So four sections for the whole system are more than enough for me to sort papers.


Organizing mail center


The first two pockets are holding all papers that come in and out of the home. Inbox for incoming mail and Outbox for outgoing one. Paying bills as soon as possible and checking the mail daily are excellent tips for keeping your papers organized. So these two categories are so helpful when I feel lazy to sort the mail in more details or when I am in a hurry. When I get the mail, the whole papers are kept in the inbox section till the time they get sorted. The Outbox section holds the papers that need to go somewhere out of the house.

Organizing mail center


The other two pockets are used when I have some time to sort the mail. "To File" is the pocket where I put any papers that need to be filed in the office room or in my receipts file. Any papers I want to keep like paid bills or bank statements are kept in there.


Organizing mail center


Any bills need to be paid, paper that needs an action to call, to reserve or to ask for more details are all kept in the "To Process" pocket. It also holds any papers I want to take look at like catalogues or invitations. Any other unneeded papers are thrown away in the trash can after blacking out some sensitive information.

Organizing mail centre center

How to you sort your mail? What are the categories you specify for it? I am waiting for you to share your organizing projects to inspire me. See you in the up-coming post.

Monday, May 11, 2015

Organized receipts and home papers

One of my favourite small,quick and easy organizing projects I have done through the latest months, is organizing receipts and home papers. We used to keep all long term receipts in addition to some helpful information papers like flyers and menus to be available when we need them.

Organized receipts and home papers

Tuesday, May 5, 2015

A laundry labels' giude printable

I think it's time to talk again about laundry a little bit. I feel I did nothing in my day if I still have laundry piles in our laundry hamper. I like to divide laundry to white light dark and delicate. It's all about the laundry you have in the hamper. Right?

But there's something we all have to care about before doing laundry . Yes, you're right . Those mysterious labels in the back of the laundry pieces. In the past it was easier for me to try a little wash or some detergent to the piece of clothes rather than searching about the meaning of their labels on the internet.

But not any more. I made this laundry guide printable is very helpful in the laundry room. In helping to take care of your laundry this is awesome.

A laundry labels' giude printable
Download Now

Feel free to download this adorable printable from here. This really will help . No search on the internet any more for mysterious labels. No shrunken shirts or stretched  sweaters. No cloudy blouses or painted pants. Wohoooo..

So I  love to hear from you. How this handy printable effects your laundry daily duties? what were you doing when you see the labels before it. Leave a comment below and see you in the next post.

Friday, May 1, 2015

A handy kitchen cart


Choosing to have a handy cart was one of  good solutions to maximize space in our little small kitchen. I believe that the kitchen cart  must be functional enough to help you when you are cooking a tasty dinner.

In the past my kitchen cart was full of grocery plastic bags and some clutters. It was a shame to have pictures that time. In fact, I wasn't expecting it to turned out beautifully like that .

So, I am so excited to share my kitchen cart I tackled a few weeks ago. I aimed to make it handy for me while cooking, and because I am dying for more little work space in the kitchen, the cart is sooo thankful to hold my cooking tools I use everyday rather than having them on my counter top.  

Organize kitchen cart


In addition to put my cooking tools I use on a daily basis, I loved to make it decorative and have a little of my touch. You may noticed I attached a tray to act as a shelf there and it so shiny and looks fabulous.


Organize kitchen cart


The cart is taking a place beside my kitchen lower cabinets and it is exactly facing the stove. So I decided to put my cute utensils' jars I shared last week on top. They help me to get things done as quickly as possible.

Organize kitchen cart

I am dividing  my utensils into three categories (prepare, cook and serve). Each jar is specified to category. I also added my kitchen towels that I use in holding hot pots and trays or to dry some dishes.

Organize kitchen cart


I love to keep my kitchen hand towels in reach. So for me, this is the best place to keep them on hand. I  used a small tray holding them. I also have our tangy juice and a beautiful flower wooden jar to add a decoration to my kitchen cart.

Last but not least. I added extra kitchen towels In the bottom in case I am running out of the towels on the roll above.

What do you have in your kitchen cart? Do you have your daily pots and pans, mugs and bawls? I like to hear from you so please leave a comment below. See you in the up-coming posts.

Monday, April 27, 2015

Tasty meal in 10 min


Baking is one of my fun challenges I really love, specially when it is in the very early weekend morning. I love the smell , the atmosphere and the warmness coming from the oven. It feels so family time. Right?

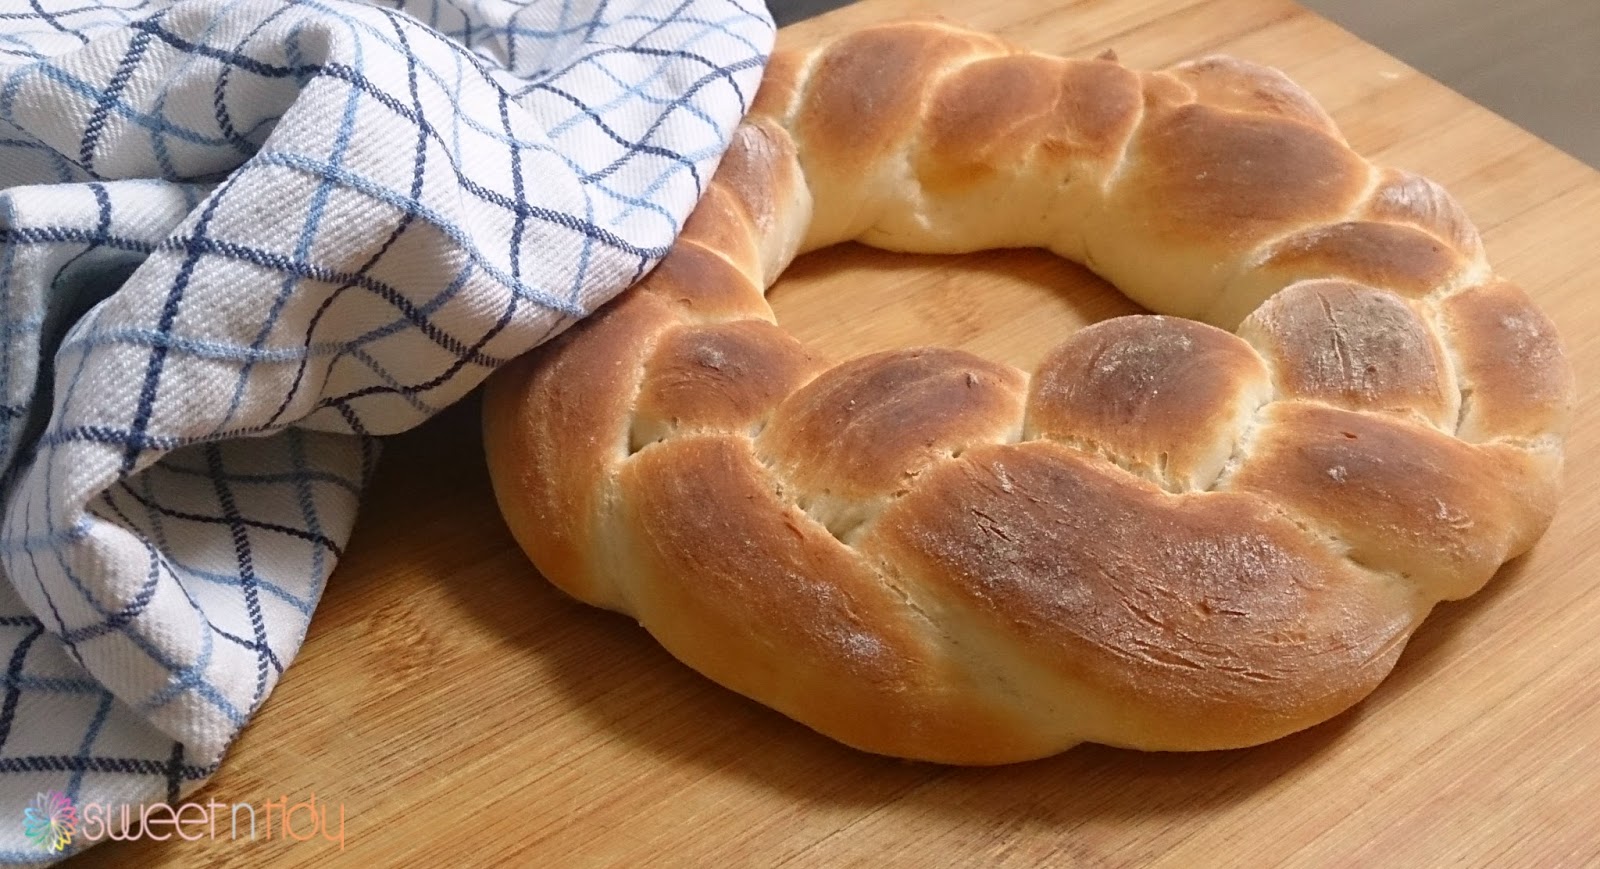
This beautiful pastry took only 10 minutes to prepare.


Tasty meal in 10 min


 The secret of this pastry depends on a fact. The more liquid dough you make , the more active yeast you have. So the half of the flour amount has to be added to the full amount of the water with the yeast and sugar as a start. Then leave the yeast to work with the sugar for 10 minutes before shaping the dough.

Tasty meal in 10 min

Ingredients


This amount is enough to make couple of braids.

2 1/2 cups of baking pastry flour.
1 cup of warm water.
10 gm or 1tbsp of dry yeast .
1/4 cup of oil or butter.
1/4 cup of sugar.

How to do it


1 - Add the half of the flour amount ( 1 1/4 in this case ) with the whole amount of water (1 cup) in a big bawl with the yeast and the sugar and mix very well.

2 - Leave the mix for 10 minutes in a dark and warm place.

4 - After that, add the oil or the butter and the other half of the flour amount and mix until you get non sticky dough. This may require a little bunch flour or a couple millimetres of water according to the flour you use. Don't worry if your dough sticks a little bit.

5 - Turn on your oven to 180-200 degree.

6 - divide the dough  into two parts. Take each part and divide it into three medium tubes and create a braid. Attach the end of the braid with the start of it. Put it in a baking tray.

7 - This is optional step. If you want the dough to have more and more size. Turn off the oven and leave your first braid into it to enlarge while you are preparing the other braid.

8 - Bake in 180-200 degree for 15 minutes for each braid.

9 - Turn the top of the oven on to create the brown top. You don't have to add egg or coffee or anything.


This beautiful pastry called "Shoreek" in Egypt. It is great as a breakfast or dinner. You can see how cottony and fluffy it is from the inside.

Tasty meal in 10 min

I really love it. I also bake this beautiful pastry whenever we feel hungry or between meals. Easy and fast. Try it and tell me. I like to hear from you. Leave a comment if you want more easy and simple recipes for dinner, breakfast or snack. See you in the up-coming posts.


Friday, April 24, 2015

Organizing medicine


Our beautiful bathroom has a very small medicine cabinet, so I keep all our medicines and vitamins in a home care area we established couple of months ago. It is really a fantastic feel having all medication in one place. Easy find, easy grab and easy put away.

In addition to my toddler medication, we keep our vitamins, first aid, medicines and some medical tools. I decided to keep our toddler medication in his closet as a trick to avoid jam-packed stuff in one area.

In order to organize our medicines, the first step should be purging all expired stuff or medicines that will not be used again like surgery or pregnancy medications. Then I started to categorize them according to the reasons. When I have a pain in muscles I am not sure if I have a bill, spray or gel as a pain killer for it. So categorizing medicines according to type is not working for me.


How to organize medicine


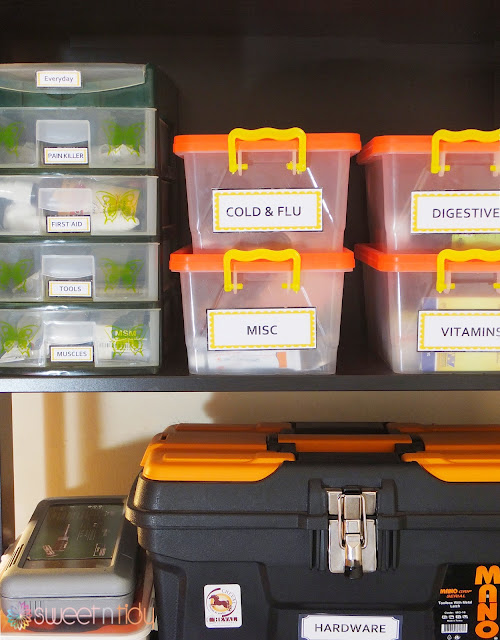
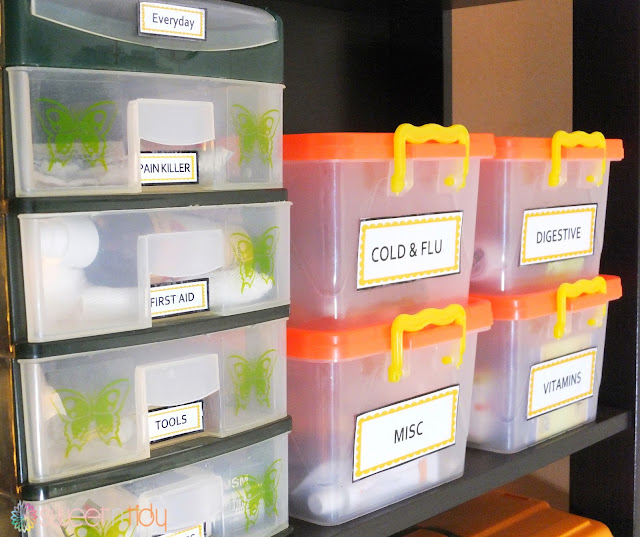
For this easy cute medication system, I chose easy system for less used stuff, easier one for more used stuff and the easiest for the most used. I purchased these boxes in an inexpensive price. I put the digestive and flu medicines on top because we use them more. Other medicines and extra vitamins in the bottom.


How to organize medicine


I love drawers for easier access, so they are convenient for more used medicines. Pain killer and first aid need to have easy home and because we use the muscles and bones medicines the most, I chose to put them in drawer as well.


How to organize medicine


Everyday vitamins and medicines are kept on the very top section in the drawer box for the easiest reach. Courses medicines - like antibiotic in case of flu-  are kept there in order not to miss them.


How to organize medicine


Tools that we use during medication are also kept in one of the drawers. Syringes,  fever patches and thermometers are all in there.


I am looking forward your projects to inspire me. Tell me how do you keep and store your medicines. How does it impact to your daily routine. Comment and subscribe in order not to miss any post. See in the next post.
                                                            

Saturday, April 18, 2015

Organizing kitchen utensils

Although I do not have that much of kitchen utensils, they were jam packed inside the kitchen drawer. It was hard to find one of them in there without getting a little hurt because of a gadget somewhere in the drawer.

They had unknown place with the other kitchen tools in the drawer until I found those cute holders for kitchen utensils in "Carrefour". They were pretty cheap and really useful for my everyday use utensils.

Organizing kitchen utensils

They act as a very convenient home for the kitchen utensils that I use everyday. What is also nice about these holders that they can be hanged next to the stove or working table.

First of all purging is a must for utensils specially when they are duplicated or some of them are out of use for a long time.

Organizing kitchen utensils


Categorizing them was the next step, I was thinking about ( bake , cook , serve ) way to organize my utensils. But since I am not baking too much and I use only one whisk for only cooking sauces, I was thinking about preparing, cooking and serving food as categories. So I got my label papers and printed out some elegant labels to decorate the cups and add more functionality to them. 


The prepare cup holds all the utensils I use in preparing food. Silicon brush , spatulas, strainer, vegetable peeler , lemon squeezer, meat cutting knife and also kitchen scissors. I suggest also any utensils used in preparing, cutting and cleaning food such as fish peeler or potato masher.  In cook cup there are whisks, draining spoon and tongs. Last but not least in serve cup there are cake and pizza serving spoons and ladles. I also have a place there for spaghetti serving spoon and ice cream spoon .


Organizing kitchen utensils

I chose my kitchen cart as a home for these cute holders and they are so handy there. They really took few minutes to finish.  Do you have any other solutions for your everyday use utensils ? Looking to see you in the up-coming posts and looking more for your organizing projects to share.

Thursday, April 16, 2015

Happy Easter + Back again

It has been a long time since I released my last post. I really missed my few beautiful readers and I missed blogging so much. It was a hard way to go through to be able to back in blogging. I was making some changes in house and redesigning some of stuff places.  I just needed some time to get myself organized with bunch of challenges I am living with around my home.  You will excuse me if I said that I have no pantry. No coat closet. No linen closet. No laundry room. No basement or garage. I have smallest kitchen ever. I live in two bathrooms and one kitchen house with no closed cabinets under any sink. I know I can get some extra furniture and wardrobes and add some storages everywhere but as you know, we are renting the house and moving into smaller house is an option and I like to be sure I will not end up with throwing away some furniture plus I like the challenges and problem solving. So I am so excited about coming back and share all my solutions I came up with in the upcoming posts.

you also may noticed that www.sweetntidy.blogspot.com is changed into www.sweetntidy.com. Yes, I made some changes to our blog and I am looking forward a cleaner and neater look for its pages. Also looking forward improving my writing and photographing skills.


It's Easter time. I hope these beautiful Easter eggs give a good reason to forgive me for this long time of absence. And I will take the chance to say Happy Easter for you and please enjoy the beautiful weather as much as you can.

Happy Easter eggs


In Easter and some special events, I like to show up my talent in decorating and DIYing. Easter is a good chance for playing with colors. I tried as much as I can to break the eggs as cleaner as possible with keeping the egg shape at the same time. It took some time but it worth it.

Happy Easter eggs


I also chose my son little basket he plays with to act as a home of my Easter eggs. Speaking about colors and fragile eggs, if you have toddlers do not try this at home :D :D. There were some accidents but they finally went fine. Maybe I should apology for taking his beautiful handmade basket.

Happy Easter eggs

I used bright colors and tried some beautiful shapes and flowers. Wasn't so hesitated to use some black. It gives awesome contrasts. also cutting some light brown scrap papers was a good idea to fill in the bottom of the basket to give that kind of nest look. I loved how they become and they are ready to decorate my home.

Happy Easter eggs

For me I liked not to make the shapes so perfect and show a little hand drawing and  avoiding so sharp and harsh lines and shapes. I like it that way because it shows up the DIY atmosphere and home warmness a little, right?

Happy Easter eggs

Using some color markers would be great also for drawing some shapes and flower. For me I used water colors and it turned out so beautifully also with the paint brush.

So, This is how I decorated my Easter eggs. I like to hear from you how do you spend your Easter time and I will be happy I you share your Easter eggs.