Showing posts with label Solutions. Show all posts

Monday, September 15, 2014

Make your own Magic hanger


Make your own Magic hanger


Remember those magic hangers we see on TV and here and there over the internet ?


You know how much this saves space, right?. It is useful for small closets and limited spaces. I wish I could buy too many, but why I have to buy when I already have a free one in my home? I just inspired the idea and it's all  done. I couldn't believe I have it. 


Anyone can do it with no time . It's super easy and inexpensive. Do you you know the hangers we used to  hang behind doors? those which you find everywhere in dollar store ? Just check this out.


Make your own Magic hanger

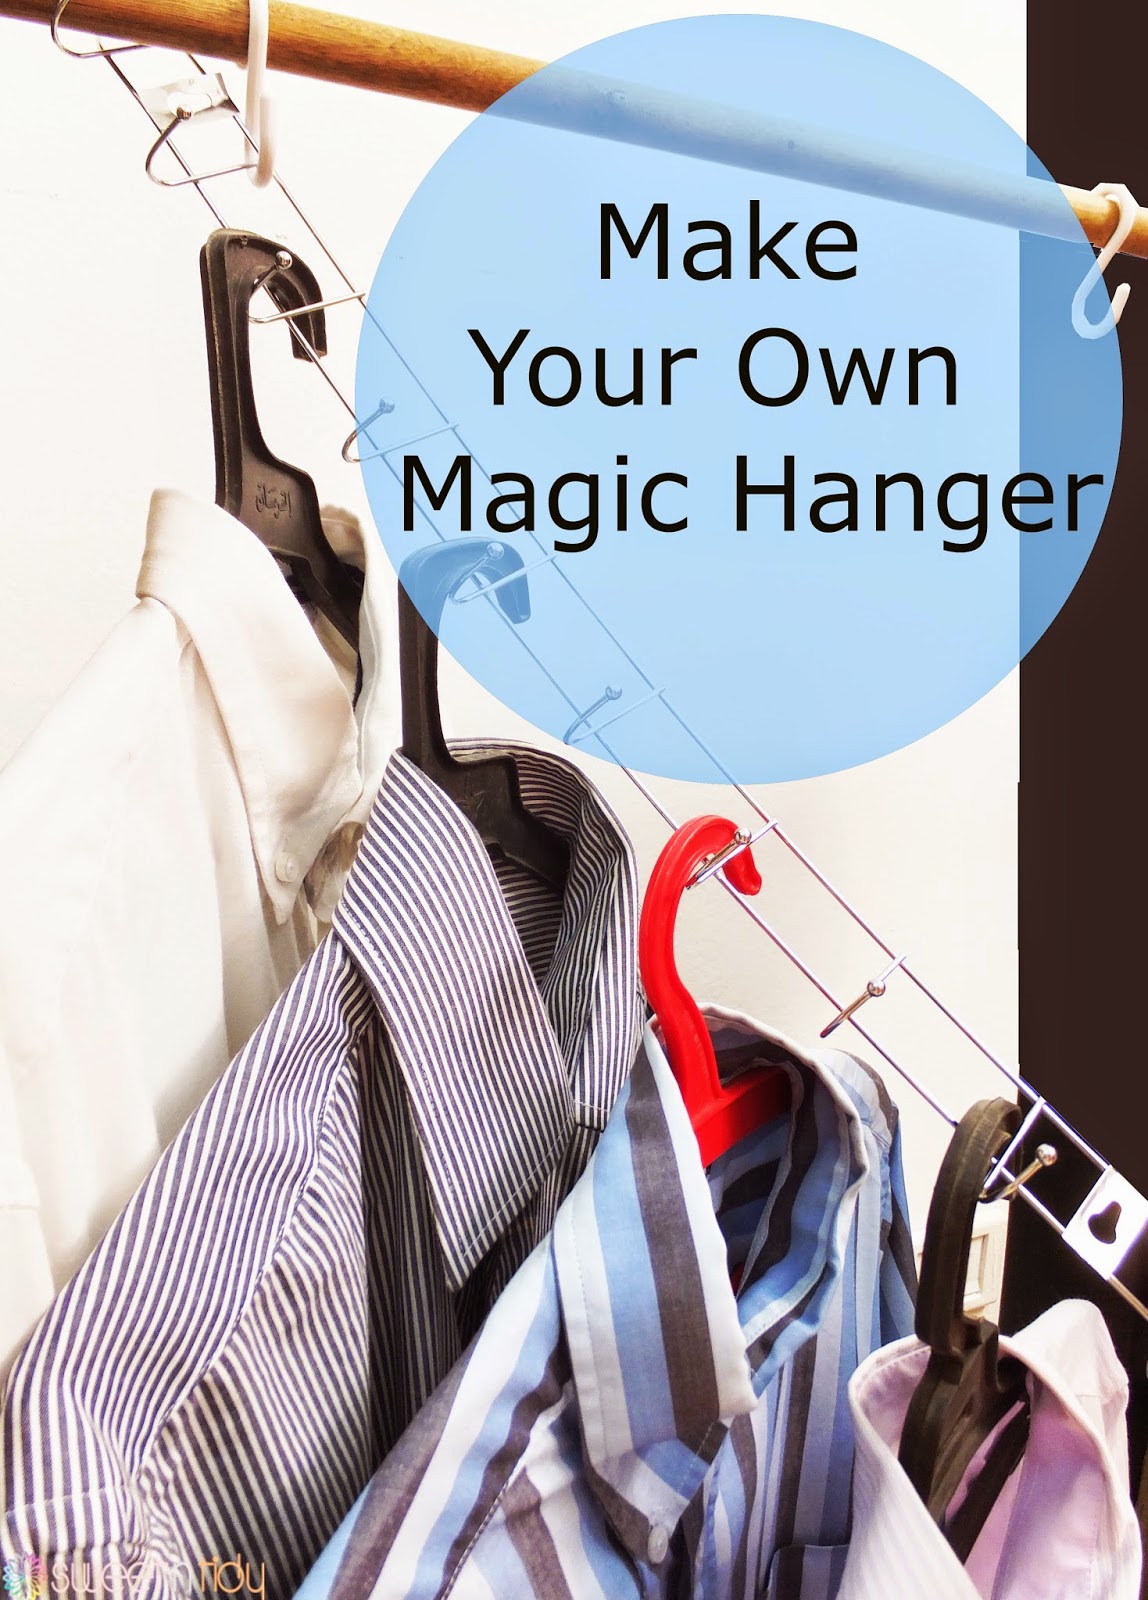
This is the normal hanger. With S-shape hooks I hang it to the closet stick.


 The hanger already is divided like a chain.I hanged a cloth hanger in each section.


So this is the normal state for the magic hanger. To maximize the space . Just remove one S-shape hook and you are done. Are you ready?

Make your own Magic hanger

Tadaaaaaaaaaaaaaaa .


All the shirts now are hanging vertically . I love the way it turns. 


Make your own Magic hanger


You can see now. The shirts take no much space . No screws . No drill . No even glue and DIY complicated steps. Just S- shape hook and regular door hanger. you are done. Congratulation for the new magic hanger you freely have.


I hope you liked this post. Please leave a comment below if you liked this. Make my day and subscribe to not miss any up-coming posts. See you.

Thursday, July 31, 2014

Things to care about when you are doing laundry

Today I will share things you have to take care about when you are doing your laundry because I noticed some popular problems when wives make laundry.

Thing to care about you are doing your laundry

For example when you have a shirt that you hand washed, it will be full of water. If  you hang it with clothespins as shown in the wrong section the pins will create creases in the shoulders of the shirt because it was heavy and full of water when you hanged it. To avoid this leave it horizontally on a table or an internal rag until it dries.

Thing to care about you are doing your laundry

Also if you a have cotton shirt, don't hang it  from bottom as shown in the wrong part above, because it will end up with damaged shape. Cotton is easy to stretch when it is wet so be-careful. To avoid this fold it into half and hang it from under sleeves like shown.

Thing to care about you are doing your laundry

When you have a dress that has lots of buttons and accessories it's better for you to turn it inside out because if you don't you may find all the buttons and accessories in the washing machine.

Thing to care about you are doing your laundry

Some bad clothespins made of iron make some rug stain on the clothes when they are wet. Be-careful and use the plastic pins.

I hope you find this post helpful. I am waiting for your feedback and comments. See you next post.

Monday, July 28, 2014

What makes you hate laundry


Laundry means a pile for everybody. I have to say the truth. Like most of us, I hate laundry. I used to have a pile of laundry all the time. I always have the same problem with my baby that he has  nothing to wear after all his clothes dropped  in laundry basket screaming for wash. I have to spend two or three days getting rid of laundry pile every week with hard working washing  machine and no extra space to hang out the wet clothes.

I live in a good weather environment. Dryer for us is an accessory that we will never think of when we buy home machines because we already have a good, hot and shiny weather to dry clothes . The washing machine already rinse the clothes up to 70% dryness or more. We hang the 70% wet clothes in balcony for fresh air and  shiny sunlight killing germs. Sounds good, but I still hated the laundry. Before I go to my problem let me think about what makes most of women hate laundry and have pile of it.

Bad weather


If you have a bad weather in your environment, it means that you will not make your laundry for today. This is an easy solved problem by finding a room in your home that has a good amount of natural light and with internal rack you are done.

Too lazy


I have to stop here to think about the reasons make you feel lazy about the laundry like :

Long process


We all think that laundry takes forever to be done. Very long process to be run. drop clothes in laundry basket, divide them, check pockets, wash them, dry them if you have dryer, hang them, collect them, fold them, iron them and put them in closet, them, them them ... lol . Sounds too many steps with them. This frustrates you as any long process to do in home.

Heavy washing basket.


If you have a pile of laundry which looks like weights in your hands, you will be the most frustrated wife in the world. You will spend the whole day washing clothes with long programs in your washing machine. They are too many and you are too busy.

uncleaned balcony or laundry room.

If you have balcony  that's full of dust or a messy laundry room, this will be a main reason to make you hate laundry. It is just because sometimes we ignore the balcony as if it is not a part of the home. Like it is outside and always full of dust and it takes a long process to clean.

So how to make it easier and overcome these problems? here you are some tips

Overcome bad weather


As I said if you have a bad weather like one or couple of days, dry your clothes over an internal rack. If you have bad weather most of the time, dryer must be added to your laundry room if you don't already have one.

Overcome the heavy baskets


Sometimes you are in a hurry and bring some clothes to wear from the closet, wear them and you change your mind or you will not wear them for any reason. After a while when you organize,  you will not be sure is this is uncleaned or what and it ends up to be in the laundry basket. Have a moment to drop them in a place you know, instead of throwing them in the ground. Same goes for work clothes you wear for one day. Just hang them into fresh area and they will return like new. Don't think it is easy to put all clothes around you in
the laundry basket. Plus I will share with you my routine that overcame all of problems we mentioned above in the next posts.

Overcome uncleaned laundry room

Don't  ignore your balcony. Treat  it as a part of your living room. Clean it whenever you clean your home. Also make your laundry room a beautiful place for you like adding some frames, plants or table with a flower vase. this will motivate you for going to balcony or laundry room too many times.You are done.


I like to hear from you . what makes you hate the laundry. On the other hand if you don't hate laundry tell me why do you like it. What makes you like it. I am waiting for your feedback and comments. See you next post

Saturday, May 24, 2014

Nursery organizing with zero budget - My baby dresser

I am very excited to share my baby dresser organizing with you and I hope you like it as I do. This dresser is only for his undershirts, under-trousers and some stuff I use for him often like his nail clipper, some nursery stuff and similarities. In this project I spent ZERO MONEY!!


I will show you the dresser from the front. As usual about me, I like to label everything. but these are the most adorable labels I ever made. Have a look

Nursery organizing - My baby dresser

Like you see, the first drawer has his nursery tools, feeding tools, medicines and baby oils. The second for long and short sleeves and underwear. Third one has his shoes, gloves and bibs and the last one is for toys.
So let's start our tour.

Nursery organizing - My baby dresser

Before I put anything inside I made this cute divider out of cardboard and I covered it with contact paper. It doesn't look perfect but it is really functional and doesn't look that bad !!

Nursery organizing - My baby dresser

This is the first drawer. It doesn't look pretty like those you see around the internet but as you see everything is divided and organized. There are his little hair comb, his little nail clipper. I put them into a galaxy chocolate box lid. It works perfectly because it has a cute depth, the tools are small and it fits perfectly on that spot. The rest of the box is in the next drawer. Also the drawer has baby powder, baby oils and baby lotions. Also his medicines which I labeled their cap so I can see everything from the top. Also his ointments and droppers.


Nursery organizing - My baby dresser

Second drawer has long sleeves on the left, short sleeves on the right, under trousers in front (He doesn't have too many) and underwear in galaxy chocolate box.

Nursery organizing - My baby dresser

Third one has small little things like his gloves , his socks, his shoes and bibs. As well as his yellow scarf and hats.

Nursery organizing - My baby dresser

This was about my baby dresser. If you like to know how I did fold the clothes click here. If you have any organizing project you like to share I will be glad to share it here in my blog. I am waiting for your responses, comments and feedback . See you next post.


Wednesday, May 21, 2014

How to organize fridge - My fridge tour

This is one of the most excited posts I would like to share since sometime and many of you have been waiting for it. I will take you in a tour in my fridge.

First of all I like to label EVERYTHING. I know people will make some fun of me but I don't care. I just like to label because it feels awesome and very neat for me. It is easy for me to organize like this. If I have a family guest s/he will feel comfortable to open the fridge and pick whatever to help me cooking or to eat something.

Let us start by the very first shelf in the fridge. My fridge is neither too small nor too big. It's normal size.

How to organize fridge - My fridge tour

The first shelf has all things we have in breakfast or simple light dinner, i.e all things we get from grocery like cheeses, olives, pickles, halvah, pastrami and luncheon. I like always to put them into boxes in order to not leak anywhere or dry or have a bad smell in the fridge.

How to organize fridge - Fridge tour

How to organize fridge - Fridge tour

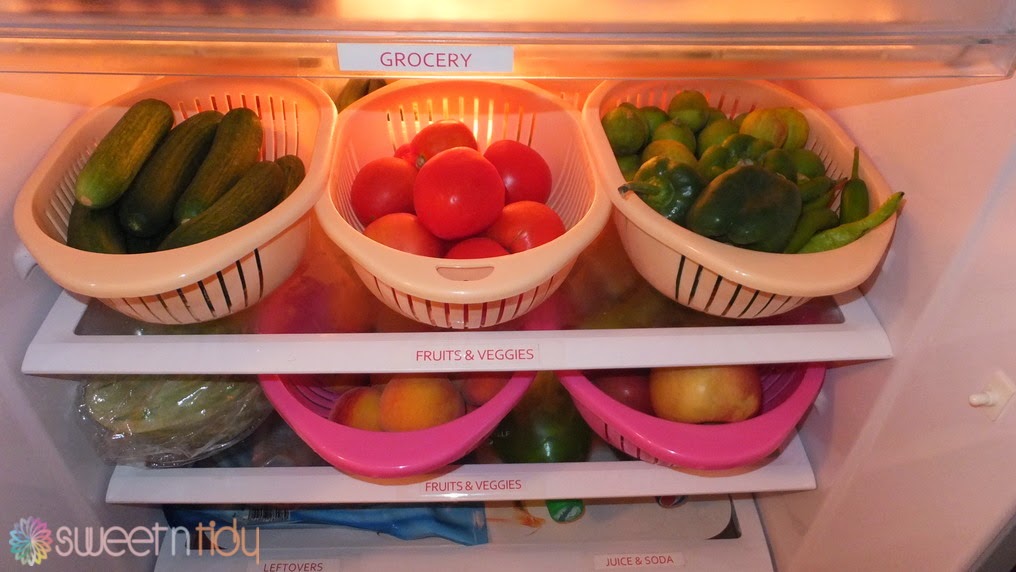
For the second and third shelves, I really like them because I used to put fruits and veggies in colanders and wash them , leave them to dry whenever I came from the hyper market. It feels AWESOME picking fruits to eat without any offer to wash them. Or to make a salad on the spot with no wash. Everything is dried and clean I really like that.

How to organize fridge - Fridge tour

The last shelf is for juice and soda as well as for leftovers from dinner. I managed to put fridge coasters for all shelves but I felt I will not see the beauty of my fridge in fruits and veggies colors and stuff. So I put one coaster in the last shelf because I believe it will prevent soda bottles from moving around :) .

How to organize fridge - Fridge tour

In the bottom drawer I have snacks in extra colanders and dry goods that I believe that they last longer in the fridge.Let's have a look inside

How to organize fridge - Fridge tour

Some chocolate bars and my home-made lazy cake. I like to make lazy cakes for breakfast when my baby cries all day long I need something to give me power and at the same time ready to eat. On the right I have tamarind, wheat germs etc..Let's move to the door.

How to organize fridge - Fridge tour

We have water in the fridge because we live in a hot weather country specially in summer,  so we need cold fresh water everyday.

How to organize fridge - Fridge tour

the first shelf of the door I have medicine that need to be cold and eggs. I know the door is the warmest place in the fridge. But I don't have the problem of the door cooling issue specially with eggs just because I bought the fridge with already a place here for the egg, so I believe this is the right place for it. The second shelf has my baby ready-made and home-made food. Anyway I use this food during four days maximum, so I am not worry about the door cooling issue.

How to organize fridge - Fridge tour

Next shelf has all condiments we use while cooking or eating. just a quick tip here if you have your Romano cheese dried for any reason just put it in the food processor and you can add it on salad, pasta, pizza and any other kind of food. They are tasty. There is a small transparent box in the right that I use for ketchup small bags that we collect when order deliveries but it is empty now.


How to organize fridge - Fridge tour

In the last shelf I have dairy. We don't buy more than this amount weekly and some fresh cold water. I know these beautiful bottles are made for milk, but I like them because they look so nice, they are easy to pour water from it without getting the cover off, and because I didn't like the water bottles in the markets.


This was my fridge  tour I hope you liked it. If you like to share any organizing project I will be glad to share it here on my blog. I am waiting for your comments, feedback and responses. See you next post.

Tuesday, May 13, 2014

DIY : Changing table organizer for baby

It has been a long time not to  post on my blog. I really missed blogging. I had to have some time focusing on some duties of taking care of my baby and back again to the track and I think it's time to come back again.

Before going into this lovely project, all the changing needs used to be on the side table which actually my makeup mirror counter. I don't have changing table so I used my baby bed as a changing table putting a mat under him while changing.

I was thinking about plastic door organizers and fabric remote control organizers we used to see around the internet. So I made this one by my own and it REALLY WORKS. All what I needed were fabric from my craft room, sponge sheet, scissor and sewing machine. I am not very good in using sewing machine. Actually I don't have one, but my mother in low has and with a little of help we have done this gorgeous organizer.


DIY : Chaning table organizer for baby

Just cut double layers of fabric that fits the height and width you need facing the wrong side of fabric out and putting single layer of the sponge sheet on the top then sew the edges except one edge that allows you to turn the fabric to the right side, turn to have the right face again and close the last edge. With the same concept create the pockets and attach them to the long piece of fabric.

I attached the organizer to the bed by some threads. Let me take you in a tour.

DIY : Chaning table organizer for baby


In the very first pocket he has his changing mat folded, some diapers and baby changing lotion.

DIY : Chaning table organizer for baby

The second pocket he has some of stuff he uses every day like hair brush, his dummy, perfume and if he currently takes any medicine.

DIY : Chaning table organizer for baby

In the very last pocket I put for him reusable milk tins that I used for paper towels, home made baby wipes ans small size trash bags to put dirty diapers inside them ...tie them strongly ... you know for the smell :D.

DIY : Chaning table organizer for baby


If you want me to make a post about  how to do it step by step or if you like to know how to make your own baby wipes or how to roll trash bags in a tin please leave a comment below and if you have any project that you like to share please send me on my E-mail . I will be happy to share it here in my blog. see you soon

Thursday, March 27, 2014

How to organize pots and pans

Hey. It's the middle night here trying to spend this time usefully and organize my pots and pans cabinet. Actually I used to hate to grab pots from it because it was messy and I had to carry heavy things to get what I want. But after I organize it, I keep opening it as I go :D . I did organize this cabinet while my baby is sleeping. Can you imagine how hardly to play with pots while your baby is sleeping a even a mile away? It was late at  night, so sorry for the little darkness.

This was my pots and pans cabinet before organization. It was messy and each time I try to get a pot I had to carry heavy pots before I reach to what I wanted with unknown lid. In addition, there are too many pots I rarely use and they take much space. As a result, I put my daily two or three pots and pans in a separated kitchen island to avoid using the cabinet. The pots I ALWAYS use EVERY SINGLE DAY. I will show you it in a separated post. So this cabinet has my rest of pots.

How to organize pots and pans


Add contact paper instead of plastic covers

As you see the cabinet was messy and I used to add any cover like ugly plastic cover. What I did is to clear everything out, wipe the cabinet and add CLEAR contact paper which I think is gorgeous because it is clear.It seems that you don't put anything under things, no folds created when you pull a pot, it is shiny and easy to clean. Also baskets and containers are sliding nicely over it. You can see the difference between the two shelves after wiping and adding the contact paper.

How to organize pots and pans


Put what you rarely use away


I figured out which pots that I rarely use like when I have too many guests or have party which of-course happens once or twice a year. No one has a party everyday. Anyway I got all of these pots I rarely use and put them inside each other and put all of them in one of the lower corner. This works often for the biggest pot of each pots set you have, because they are very large, or for the pots you only use in big meals, parties, barbecue, dish parties... etc .For the Tefal pot I added some tissue paper in order not to be scratched by anything I will put inside.

How to organize pots and pans

Organize according to usage


I organized the pots from what I use daily to what i use rarely. I tried to make them all to be easy to grab without carrying any heavy things. Also I put the baking trays vertically which maximized the space and easier to pull. You can see how shiny is the clear contact paper and easy to clean.

How to organize pots and pans

Try to maximize space or add double shelves


To maximize the space, I used this serving dish which I don't use any more for serving and put inside to give a height and also kind of adding space or an additional shelf inside the cabinet.

How to organize pots and pans

I know it didn't save much space but it worked. It may shows how it works better if I have a larger pot above it. But if you have one that is taller and bigger it will work amazingly. I may put the pots over it and grab something in-front of it so I can easily grab everything. If you can see when it is behind I can easily grab what's behind and what's in front.
How to organize pots and pans

Or you can use something similar to this. this is a part from a basket tower used usually for storing onions and potatoes. You can add pots under it and above it.

How to organize pots and pans

 But unfortunately it didn't work for me. It seems like it is very hard to reach the above basket. So I didn't use it. Any suggestions? 

 If you have something similar it will work for you perfectly without going to the store and buy an expensive double shelves right?

Finally, this is the result and honestly, I am seriously thinking about put back my daily pots to the cabinet as well as I planned to organize my food storage containers. I promise to keep you up to date with these ideas.

How to organize pots and pans


I hope these tips were helpful. I am waiting for your feedback, comments, questions and responses. Your responses will be the next talking center of-course.